¶ Objects for Slice Preview
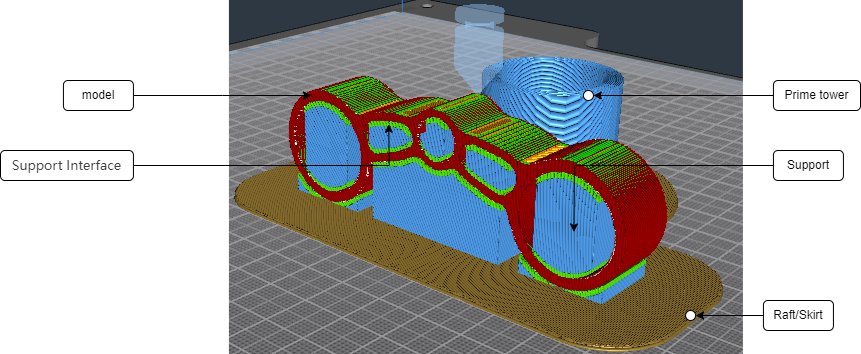
After slicing is complete and you enter the preview environment, you typically see a model composed of the following "objects":
¶ Model Definition
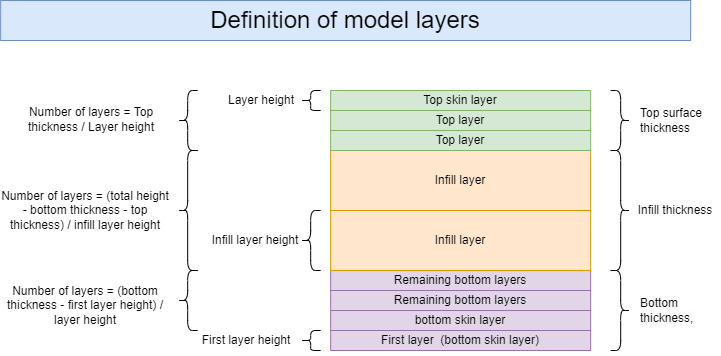
In the model, to better control the print outcome, we define the top surface, bottom surface, and infill sections. You can adjust parameters for these sections as follows:
¶ Top Surface
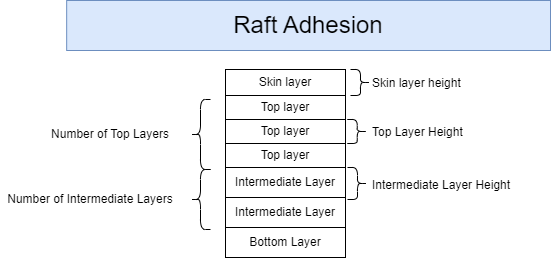
The top surface is defined by a certain number of top layers and top skin layers. You can control the number of top skin layers.
¶ Bottom Surface
The bottom surface consists of the first layer (initial layer), bottom skin layers, and other bottom layers.
¶ Infill Layer
The height of the entire model minus the thickness of the top surface and bottom surface equals the thickness of the infill layer. Of course, the model may have multiple top and bottom surfaces. The following diagram illustrates a simple model.
¶ Definition of Support
In 3D printing, the concept of support refers to temporary structures that provide support for overhanging parts or sections not directly in contact with the print bed during the printing process. These support structures are removed after printing. Without support structures, certain overhanging parts may collapse or sag due to a lack of underlying support. The use of support structures ensures the integrity and surface quality of the printed part.
¶ Key Concepts of Support Structures
Support Material: Support structures are usually printed with the same material as the main print material but can also be printed with dissolvable support materials (such as PVA or HIPS), which can be removed in post-processing with solutions.
Support Generation: In slicing software, users can set whether to automatically generate support structures and adjust the density, contact points, and shape of the support structures.
¶ Common Types of Support
¶ Tree Supports:
- Characteristics: Like tree branches, the support grows upward from the print bed, branching out to the areas needing support.
- Advantages: Saves material and reduces contact points with the model, making it easier to remove.
- Suitable Scenarios: Complex overhangs and multi-branch models.
¶ Linear Supports:
- Characteristics: Extends directly upward from the print bed to the areas needing support, usually in vertical column or grid structures.
- Advantages: Quick to generate, provides good support strength.
- Drawbacks: May damage the model surface when removed.
- Suitable Scenarios: Simple overhangs and linear models.
¶ Custom Supports:
- Characteristics: Users manually add supports in the slicing software, precisely controlling the location and shape of the supports.
- Advantages: High flexibility, material-saving, supports added only where needed.
- Drawbacks: Requires more design time and experience.
- Suitable Scenarios: Complex models needing precise support placement.
¶ Support Interface
In 3D printing, the support interface (or support contact surface) refers to the contact area between the support structure and the model. This is where the support structure directly contacts and stabilizes the overhanging parts of the print. The design and handling of the support interface significantly impact the final print quality and the ease of support removal. Properly designing and setting the support interface is crucial for ensuring print quality and ease of post-processing. Different models and print materials may require different support interface settings, so it is necessary to conduct some testing and adjustments before printing.

¶ Definition of Print Features
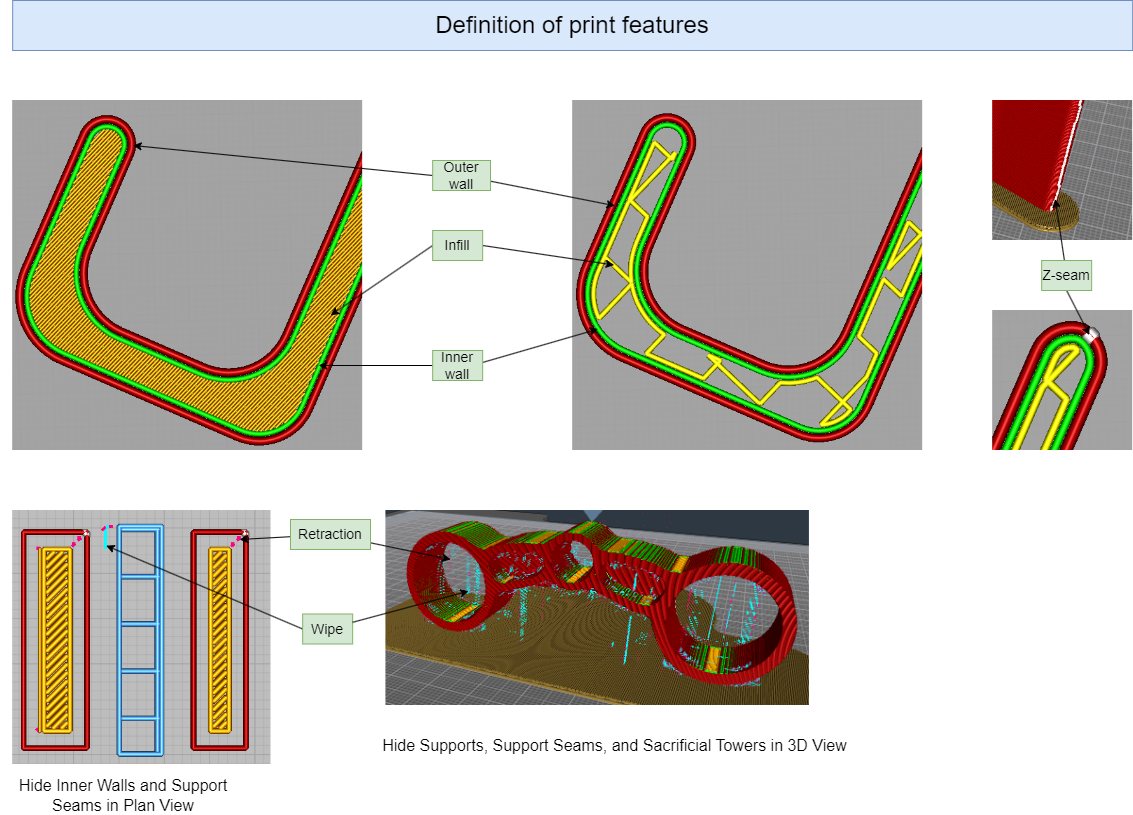
In 3D printing, understanding the concepts of outer wall, inner wall, infill, Z-seam, and skin layer is crucial for optimizing print quality and structural strength. Here are detailed explanations of these concepts:
¶ Outer Wall
- Definition: The outer wall is the outermost layer of a 3D printed model, also known as the outer perimeter. It directly affects the appearance and surface quality of the print.
- Settings: In slicing software, you can set the thickness of the outer wall (usually composed of several layers). Increasing the number of outer wall layers can improve the surface smoothness and strength of the model.
¶ Inner Wall
- Definition: The inner wall is the structure located between the outer wall and the infill, used to increase the model's strength and stability.
- Settings: The inner wall is typically composed of multiple layers, and the number of inner wall layers can be adjusted in slicing software. More inner wall layers will increase the model's strength but also add to print time and material use.
¶ Infill
- Definition: Infill refers to the internal structure of the model, usually in a grid pattern, providing internal support while maintaining overall model strength. Infill is designed to offer strength while reducing material use and print time.
- Settings: Infill density (usually expressed as a percentage) and infill pattern (such as square, hexagonal, triangular, etc.) can be set in slicing software. Higher infill density increases the model's strength but also consumes more material and time.
¶ Z-Seam
- Definition: The Z-seam is the starting and ending point of each printed layer, where the printer begins and ends each layer. The nozzle may pause slightly at these points, causing small bumps or seams that affect surface smoothness.
- Settings: Slicing software typically allows users to specify the Z-seam location, such as random positions, hidden in corners or edges of the model, or along a single line to minimize its impact on appearance.
¶ Skin Layer
- Definition: The skin layer refers to the solid layers at the top and bottom of the model, which are the outermost surfaces. Skin layers cover the infill, providing a smooth surface.
- Settings: The thickness and number of skin layers can be set in slicing software. Thicker skin layers improve surface quality and model rigidity but also increase print time.
¶ Retraction
- When the printer needs to move from one point to another without extruding material, it retracts a certain amount of molten material from the nozzle before moving. This action reduces pressure in the nozzle, preventing material from continuing to flow.
¶ Wiping
- Wiping involves a brief horizontal movement of the print head at the nozzle after retraction to clear any remaining material before starting at the new print location. This helps to further reduce stringing and unwanted filaments.
- By setting these parameters appropriately, you can optimize print time and material use while ensuring structural strength and improving the final print's surface quality and aesthetics. Different models and application scenarios may require different settings, so it's necessary to perform some testing and adjustments before printing.
¶ Vertical shells
In 3D printing, vertical walls refer to the upright wall sections that are parallel to the print bed and typically perpendicular to the X-Y plane. These walls have a 90-degree angle relative to the horizontal layers and are a common geometric feature in 3D printed models. The print quality of vertical walls largely depends on the printer's precision, print speed, nozzle temperature, and other print parameter settings.
Printing vertical walls is generally simpler in 3D printing than overhanging walls because each new layer is built directly on top of the next, providing stable support for the material. However, there are still some considerations when printing vertical walls:
1. Layer Thickness: The layer thickness significantly affects the outcome of vertical walls. Thinner layers can produce smoother walls and finer details but will increase print time.
2. Print Speed: Lower print speeds can improve the quality of vertical walls as it allows more time for the material to cool and solidify as it is added to the model.
3. Cooling: Adequate cooling is particularly important for printing slender vertical walls, as it helps the layers to solidify quickly between layers, preventing collapse and distortion.
4. Wall Thickness: The wall thickness set in the slicing software affects the strength and rigidity of the printed walls. Depending on the object being printed, it may be necessary to increase the wall thickness to ensure sufficient structural strength.
5. Nozzle Diameter: The nozzle diameter determines the line width of the print, which in turn affects the quality of the vertical walls. Smaller nozzles can print finer details but will also increase print time.
6. Infill: For solid vertical walls, appropriate infill density and pattern can enhance wall stability and prevent walls from cracking or bending under external forces.
Vertical walls may encounter issues with printing details or edges, such as oscillations or ringing, which can be addressed by adjusting the printer's mechanical stability or changing print parameters. Properly setting the parameters in the slicing software is crucial for ensuring the quality of vertical walls.

¶ Overhang Walls
In 3D printing, overhang walls refer to parts of the printed model that extend without direct support, typically inclined at angles greater than 45 degrees relative to the horizontal plane. These structures can pose challenges during printing because the material needs adequate support to maintain shape and avoid collapse.
In slicing software, users can adjust various parameters to optimize the printing of overhang walls. For example, you can set the density of support structures, the contact points, and the ease of removal. By fine-tuning these settings, users can better address the challenges of overhang walls and ensure the overall quality and stability of the printed part.

¶ Retraction
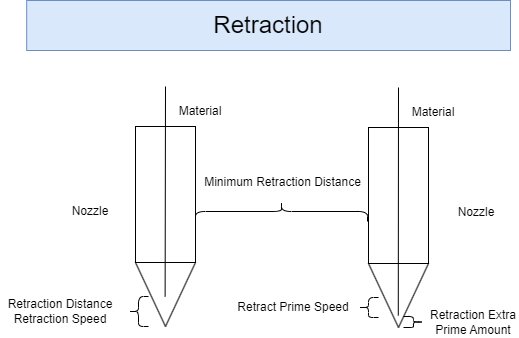
During the printing process, the toolhead frequently moves without extruding material. We generally do not want the nozzle to extrude material during these travel moves. However, due to the nozzle's temperature and internal pressure, molten filament can still leak from the nozzle, leading to stringing on the printed part. Retraction settings can help mitigate and alleviate stringing issues during printing. By retracting some filament from the hotend before the toolhead performs a travel move, the pressure within the hotend is reduced, thereby decreasing the likelihood of stringing along the travel path. Retraction typically occurs before a travel move, and at the end of the travel move, the filament is pushed back into the hotend to resume normal extrusion, ensuring there is no under-extrusion on the printed part.
¶ Adhesion
In 3D printing, ensuring that the first layer of the model adheres reliably to the print bed is crucial for a successful print. Different adhesion types can help address issues such as warping, delamination, and poor adhesion of the first layer. Here are several common adhesion types in 3D printing:
¶ Raft
Using a raft in 3D printing serves several purposes, especially when it comes to base adhesion and print quality:
- Improved Base Adhesion: A raft generates one or several extra layers of material beneath the object to enhance the adhesion between the print and the platform. This is particularly useful for materials with poor base adhesion or complex shapes.
- Reduced Warping: Certain materials like ABS are prone to warping as they cool. A raft acts as a buffer layer between the print and the platform, reducing warping caused by shrinkage.
- Leveling Uneven Print Beds: If the print bed surface is not perfectly flat, a raft can fill in these uneven areas during the initial layers, providing a more level printing foundation.
- Improved Bottom Surface Quality: The first layer of the print often directly contacts the print bed, which can lead to poor bottom surface quality. Using a raft can result in a smoother and more even bottom surface for the print, as the object itself does not directly touch the print bed but rather the raft.
- Minimizing Bottom Defects: At the start of the print, the nozzle may not be in its optimal state, leading to uneven extrusion. A raft can help prevent these initial defects from affecting the print itself.
In slicing software, raft settings are often customizable, including the number of layers, layer thickness, infill density, and spacing from the print. These settings allow users to tailor the raft to their specific printing needs, optimizing its effectiveness and improving print quality and success rates.
¶ Skirt
Definition: A skirt consists of one or more non-contact outer lines printed around the model. These lines are printed outside the perimeter of the model without connecting to it.
Purpose:
- Bed Leveling and Flow Calibration: The skirt helps ensure the printhead reaches operating temperature and calibrates material flow before printing the actual model, preventing under-extrusion or over-extrusion.
- Nozzle Cleaning: It helps clear any residual material from the nozzle, ensuring smooth extrusion at the start of the print.
- First Layer Adhesion Check: The skirt allows users to observe the adhesion of the first layer before the actual model printing begins, ensuring proper bed leveling.
Main Parameters:
- Skirt Line Count: The number of skirt lines printed around the model. More lines provide additional time to adjust printing parameters and confirm first layer adhesion.
- Skirt Distance: The distance between the skirt lines and the model. A closer distance helps more accurately detect the first layer's condition.
- Skirt Height: The number of layers for the skirt, usually set to one layer, as its primary purpose is to prepare for the initial stages of printing.
¶ Brim
Definition: A brim consists of one or more layers of extended edges printed around the bottom perimeter of the model, connected to the model's first layer.
Purpose:
Improved First Layer Adhesion: A brim increases the contact area of the model's base, enhancing the first layer's adhesion to the print bed, especially useful for models with small contact areas or complex shapes.
Warp Prevention: It helps prevent warping caused by cooling shrinkage, particularly for materials like ABS that are prone to warping.
Stabilizing Small Parts: For parts with a small bottom contact area, a brim provides additional support to prevent detachment from the print bed during printing.
Main Parameters:
Brim Width: The width of the brim extending outside the model, usually measured in line count or millimeters. A wider brim provides more adhesion area.
Brim Layers: The number of layers in the brim, typically set to one layer, as its primary purpose is to enhance first layer adhesion rather than provide structural support.